 Save to Pinterest
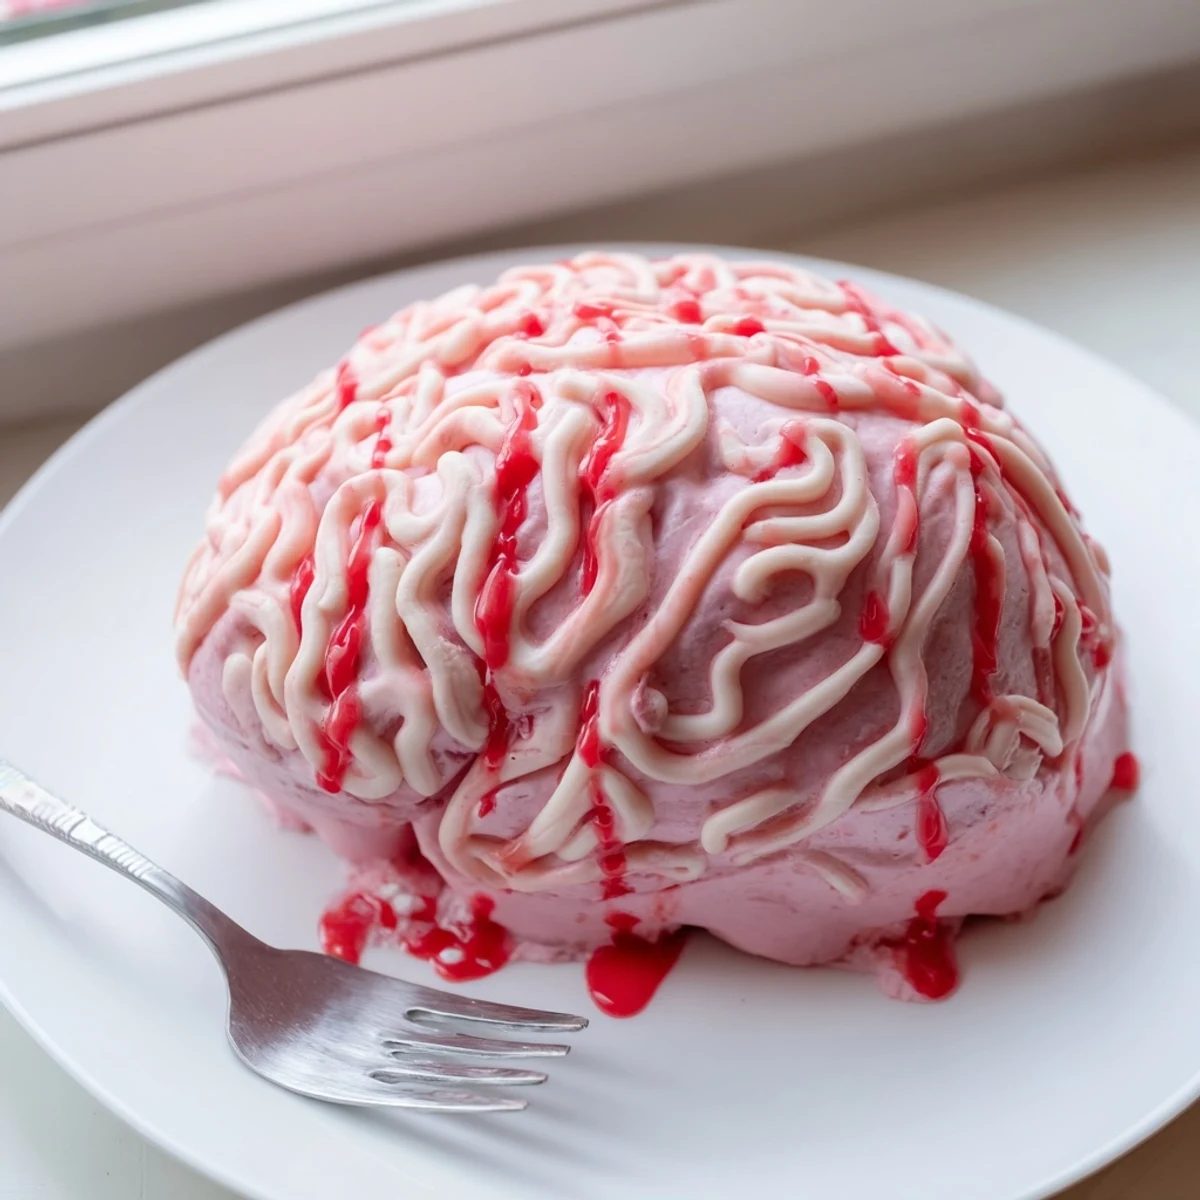
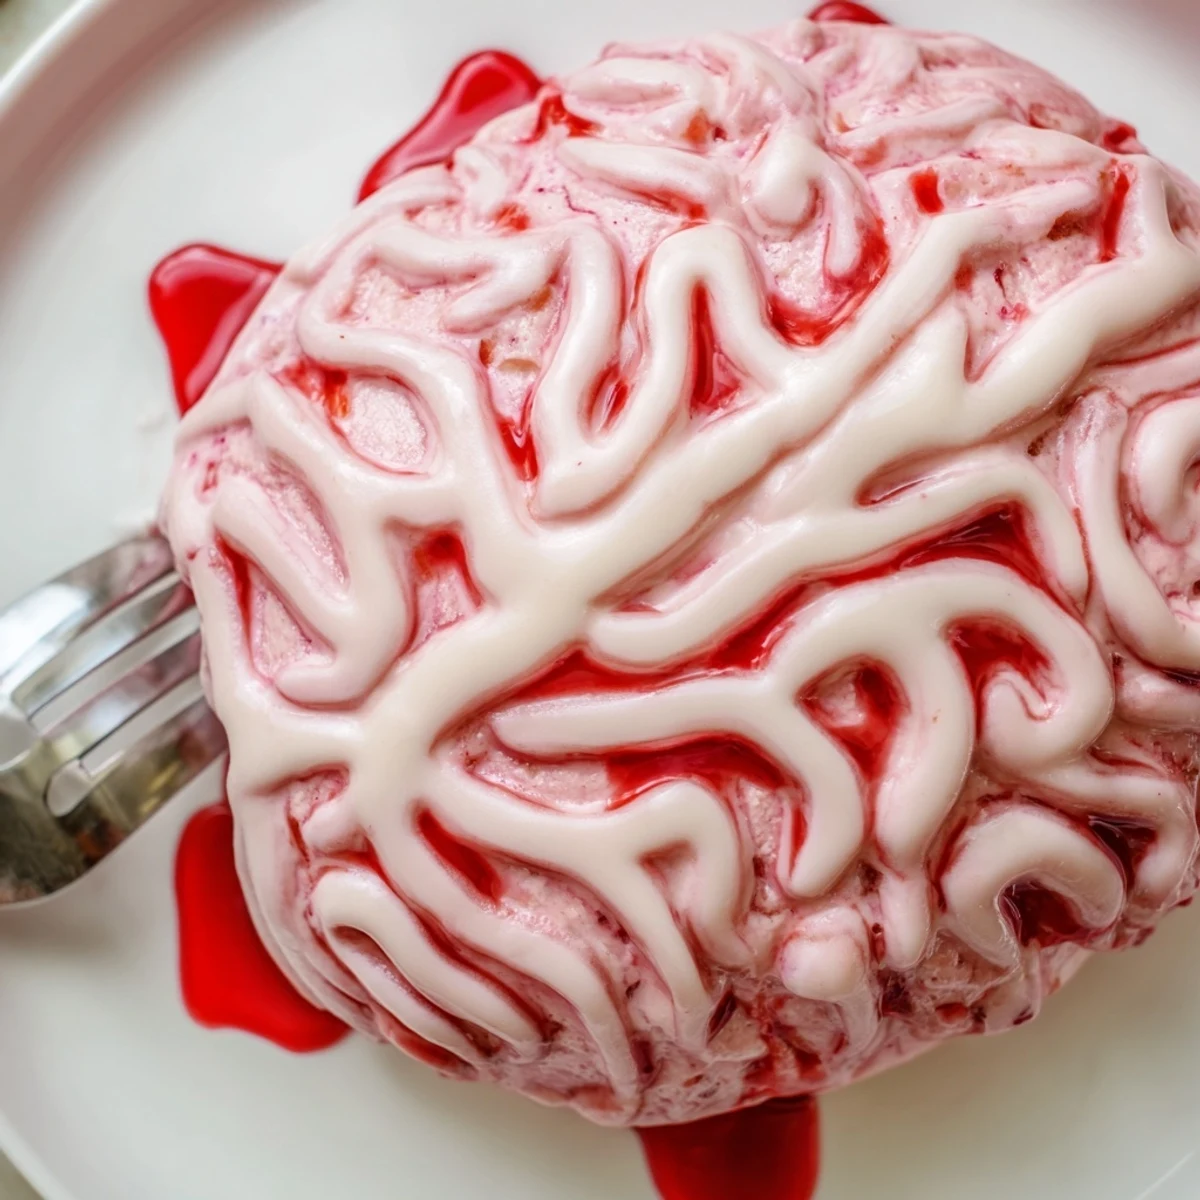
 This Halloween-themed dessert combines classic cheesecake elements with spooky presentation. A buttery graham cracker base supports layers of strawberry-infused cream cheese filling, set with gelatin for perfect structure. The entire creation is molded into a brain shape using silicone molds, then decorated with white chocolate squiggles mimicking brain folds and drizzled with strawberry coulis for an extra gory effect. The result is both visually striking and delicious, balancing sweet strawberries with rich creamy filling and crunchy crust.
My sister called me at midnight last Halloween, hyperventilating about bringing something 'actually impressive' to her work potluck. We spent three hours at my kitchen table, armed with food coloring and way too much enthusiasm, sculpting what looked like a disturbingly realistic brain. Her coworkers were equal parts horrified and delighted, and honestly? That was the best reaction we could have hoped for.
Last year I brought this to a dinner party where nobody knew what to expect. The host's seven year old took one look at it and refused to come into the kitchen for twenty minutes. Then he tried it, asked for seconds, and declared it the 'best science experiment ever.' Now his mom messages me every October requesting the recipe.
Ingredients
- 200 g graham crackers or digestive biscuits: These create the foundation and honestly, crushing them is kind of therapeutic after a long week
- 75 g unsalted butter, melted: Don't skip the melting step cold butter leaves weird dry patches in your crust that nobody wants
- 400 g fresh strawberries, hulled: Fresh berries give you that vibrant pink color that food coloring just can't fake convincingly
- 2 tbsp granulated sugar: Just enough to coax out the strawberries natural sweetness without making it cloying
- 2 tbsp water: Creates the perfect base for blooming your gelatin evenly
- 2 tsp gelatin powder: The secret weapon that transforms loose filling into something you can actually unmold without crying
- 400 g cream cheese, room temperature: Cold cream cheese = lumpy filling and nobody invited lumps to this party
- 100 g powdered sugar: Dissolves beautifully into the creamy mixture without that gritty sugar crunch
- 200 ml heavy cream: Whipped separately, this adds that cloud like texture that makes people go 'wait, this is no bake?'
- 1 tsp vanilla extract: Because even spooky desserts deserve a comforting vanilla hug
- 200 g white chocolate, melted: Creates those suspicious brain folds that look disturbingly realistic from across the room
- Pink gel food coloring: A tiny drop goes a long way toward making your brain look freshly delivered from a lab
- Extra strawberry coulis: That final bloody drizzle pushes it over the edge from cute to 'wait, is that safe to eat?'
Instructions
- Prep your brain mold:
- Line your brain shaped silicone mold or get creative with a medium oval bowl wrapped snugly in plastic wrap, making sure there are no awkward folds that will show up later
- Build the crust foundation:
- Crush those graham crackers until they're basically sand and mix thoroughly with melted butter until every last crumb is coated, then press firmly into your mold base like you mean it and chill
- Create strawberry gelatin magic:
- Blend those hulled strawberries with sugar until silky smooth, bloom your gelatin in warm water for exactly five minutes until it looks like weird little sponges, then warm until dissolved and stir into your strawberry puree before letting it cool completely
- Whip up the creamy filling:
- Beat room temperature cream cheese and powdered sugar until you can't see any lumps, separately whip your heavy cream to soft peaks, then fold everything together with vanilla and that cooled strawberry gelatin mixture until uniform
- Assemble and chill thoroughly:
- Pour that gorgeous pink filling over your prepared crust, smooth the top like a pro, and forget about it in the fridge for at least five hours because rushing this step will end in tears
- Design your brain decoration:
- Melt white chocolate and add a tiny drop of pink coloring if you want that fresh look, then pipe squiggly lines onto parchment paper like you're drawing the world's most disturbing maze and chill until set
- Final assembly and presentation:
- Carefully unmold your cheesecake onto your serving plate, arrange those chocolate brain folds on top to look convincingly cerebral, then drizzle with extra strawberry coulis for that freshly harvested effect
 Save to Pinterest
 My roommate walked in while I was piping the chocolate squiggles and genuinely asked if I was having a medical emergency. After trying a slice, she immediately asked if we could make these for every Halloween party forever. The visual shock combined with that creamy strawberry perfection is just unbeatable.
Getting That Perfect Brain Texture
The contrast between the smooth cheesecake and the slightly firm chocolate folds is what sells this dessert. I've found that piping the chocolate designs onto parchment paper first then chilling them makes application so much easier than trying to pipe directly onto the cold surface. Plus you can make any mistakes on paper where nobody will see them.
Make Ahead Strategy
This dessert actually gets better after sitting overnight in the fridge. The flavors meld together beautifully and the texture becomes even more luxurious. I always prep the chocolate squiggles two days ahead and store them between layers of parchment paper, then just assemble everything a few hours before guests arrive.
Presentation Tips That Actually Work
Serve this on a stark white plate or black platter for maximum visual impact. The color contrast makes those strawberry drizzles look incredibly convincing. A few scattered fresh strawberries around the base helps clue people in that yes, this is actually food before they work up the courage to try it.
- Keep extra strawberry sauce handy for last minute touch ups
- Have your serving slice ready before anyone arrives for dramatic effect
- Take photos quickly because it won't look this perfect for long
 Save to Pinterest
 There's something deeply satisfying about serving a dessert that makes people gasp before they even realize it's food. The way their faces shift from horror to delight when they take that first bite? That's the kind of Halloween magic that keeps me making this year after year.
Your Questions Answered
- → Do I need a brain-shaped mold to make this?
-
While a brain-shaped silicone mold creates the most authentic look, you can use a medium oval bowl lined with plastic wrap as an alternative. The final shape will be more rounded but still achieve the brain effect once decorated.
- → Can I make this dessert vegetarian?
-
Yes, simply replace the gelatin with an equal amount of agar-agar powder. Follow the same blooming and dissolving process, though agar-agar sets at room temperature and doesn't require refrigeration to firm up.
- → How long does the cheesecake need to chill?
-
The cheesecake requires at least 5 hours of chilling time to set completely. For best results, prepare it the night before your event to ensure it's firm enough to unmold and decorate without losing its shape.
- → Can I use frozen strawberries instead of fresh?
-
Frozen strawberries work perfectly fine for the strawberry puree layer. Thaw them completely before blending, and expect a slightly more intense color due to the freezing process breaking down cell walls.
- → How far in advance can I make the white chocolate brain decoration?
-
The white chocolate squiggles can be made up to 3 days in advance and stored in an airtight container in the refrigerator. Separate them with parchment paper to prevent sticking.
- → What's the best way to unmold the cheesecake?
-
Gently pull the silicone mold away from the edges or lift the plastic wrap if using a bowl method. Place a serving plate on top and invert carefully. If it sticks, dip the bottom of the mold in warm water for 5 seconds to help release.